There’s a certain kind of quiet that settles over the kitchen on a crisp October evening, the kind where the windows fog up and the air outside smells like wood smoke and falling leaves. Last week, I found myself standing at the counter with a bag of Honeycrisp apples, thinking about my grandmother’s apple pies and wishing I had something just as comforting but a little more special. That’s when I remembered these Baked Bloomin Apples, a dessert that looks like it came from a fancy bakery but feels like the warmest hug you’ve ever received. The way the apples blossom open in the oven, their petals caramelized and tender, filled with buttery sweetness and those little pockets of melted caramel, it’s nothing short of magic.
What I love most about this recipe is how it transforms something so simple into something unforgettable. You start with whole apples, and through a bit of careful cutting and a lot of love, they become these stunning bloomin creations that fill your home with the scent of cinnamon, brown sugar, and baked fruit. When you serve them warm with vanilla ice cream melting into every crevice, drizzled with extra caramel sauce, you’re not just serving dessert. You’re serving an experience, a memory in the making, something your family will ask for again and again when the weather turns cool and the apples are at their peak.
Table of Contents
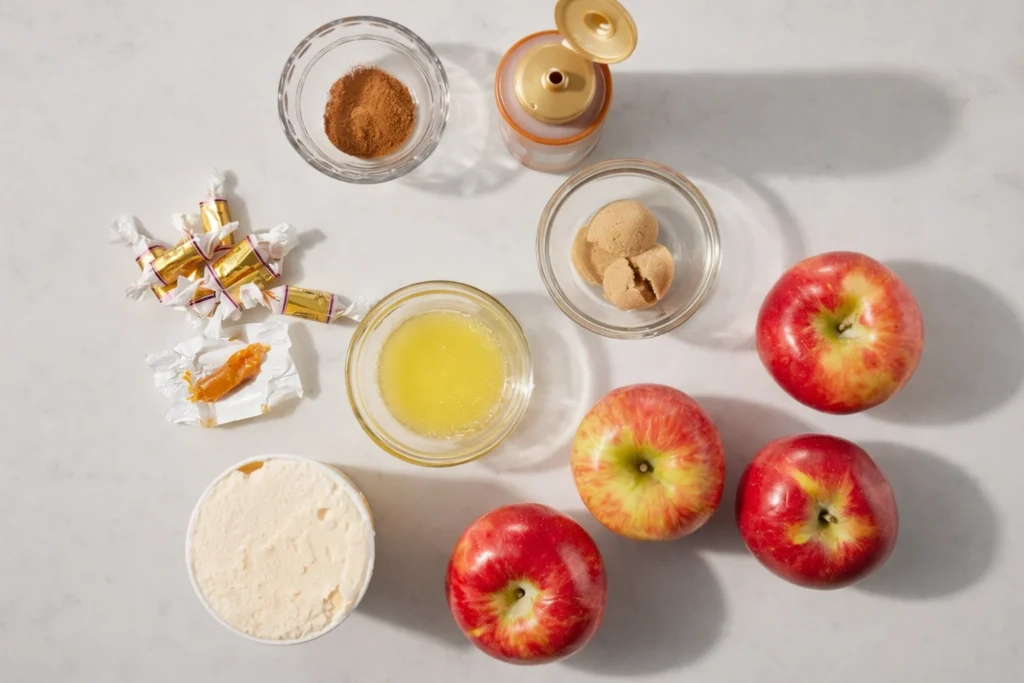
Essential Ingredients
- 4 large (9 ounce) Honeycrisp apples
- 4 tablespoons unsalted butter, melted
- 3 tablespoons light brown sugar
- 1 1/2 teaspoons apple pie spice blend
- 8 medium soft caramel squares (such as Werther’s)
- vanilla ice cream
- caramel sauce
Preparation Steps
Step 1: Preheat and Prep Your Workspace
Preheat your oven to 375 degrees Fahrenheit. Gather all your ingredients and tools so everything flows smoothly. This is a recipe that requires a little patience, but the result is absolutely worth it.
Step 2: Remove the Apple Tops
Slice off the top half-inch of each apple. This creates a flat surface and removes the stem, giving you a clean starting point for coring.
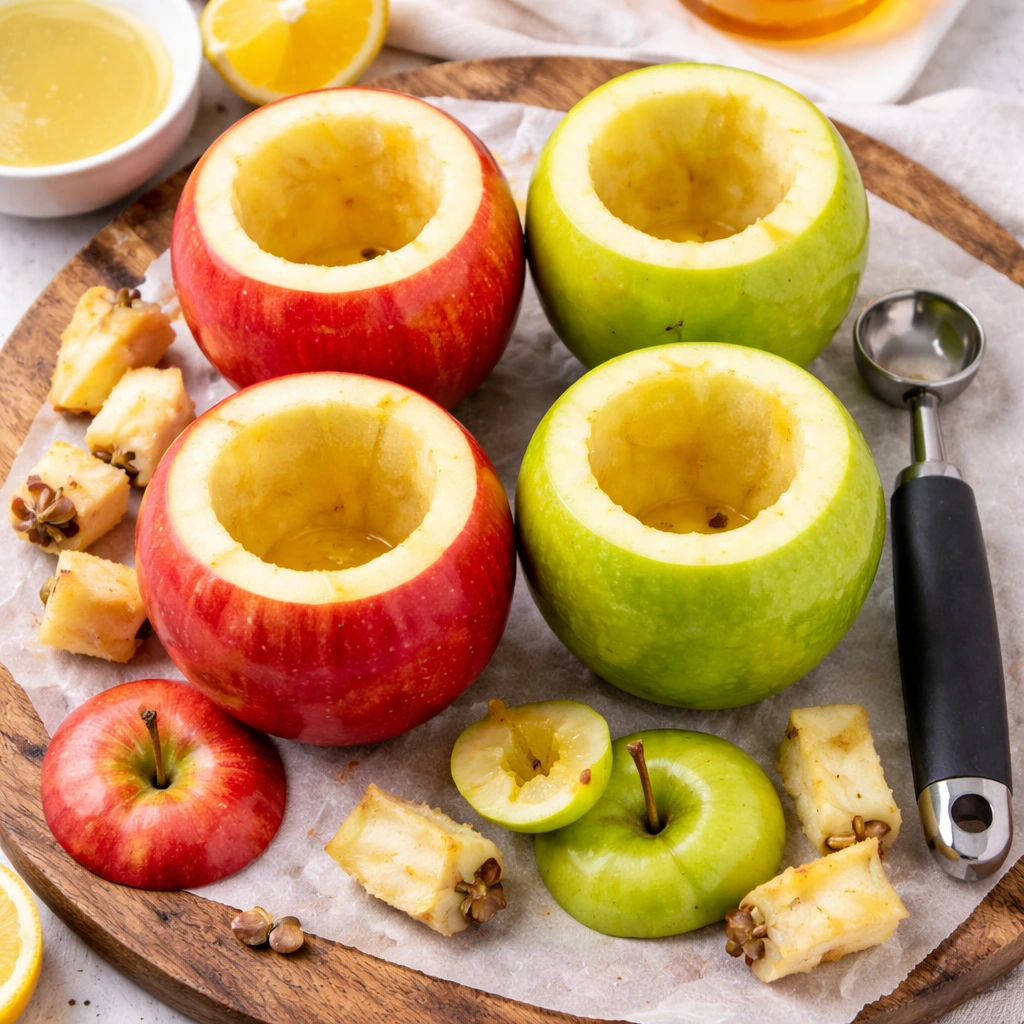
Step 3: Core the Apples Carefully
Using an apple corer, melon baller, or even a sturdy teaspoon, carefully remove the core from each apple. Start at the top and work your way down, but stop about an inch from the bottom. You want to create a well for the caramel, but you don’t want to cut all the way through or the filling will leak out.
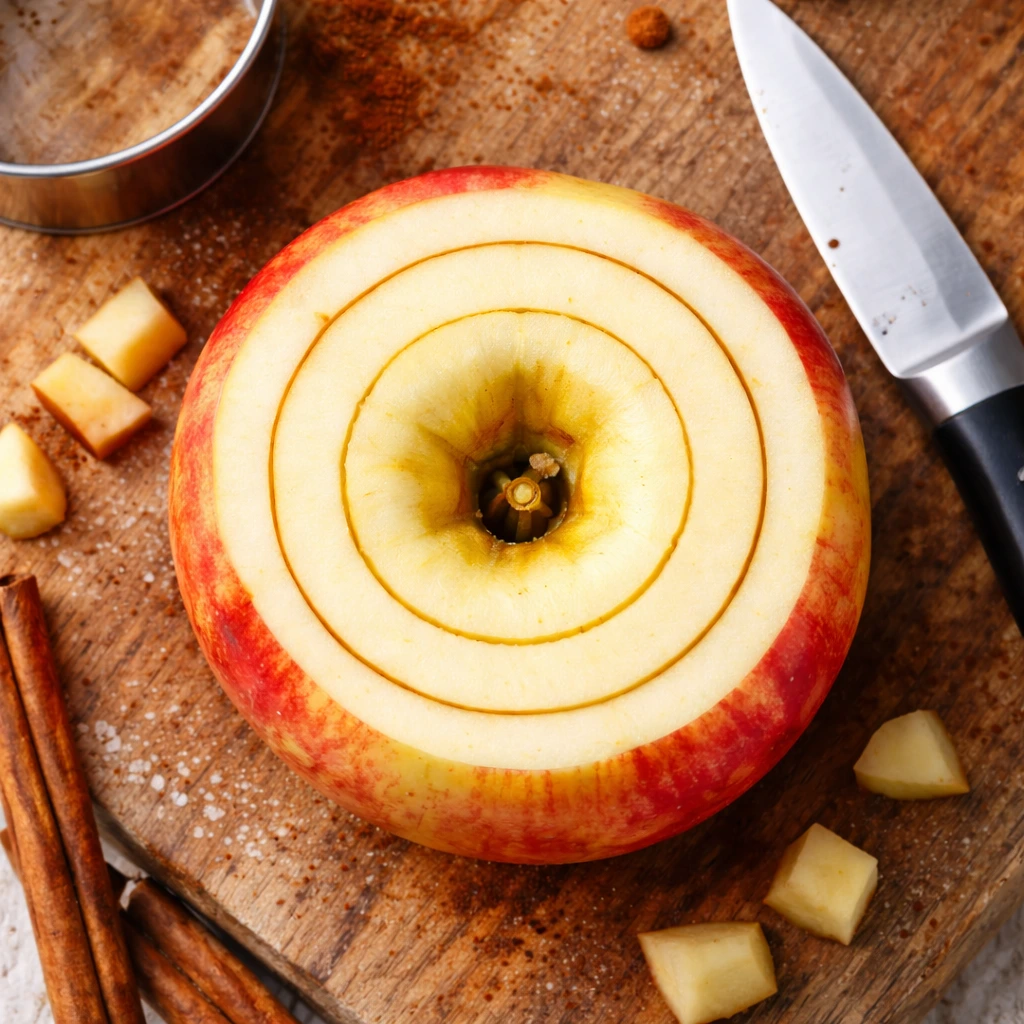
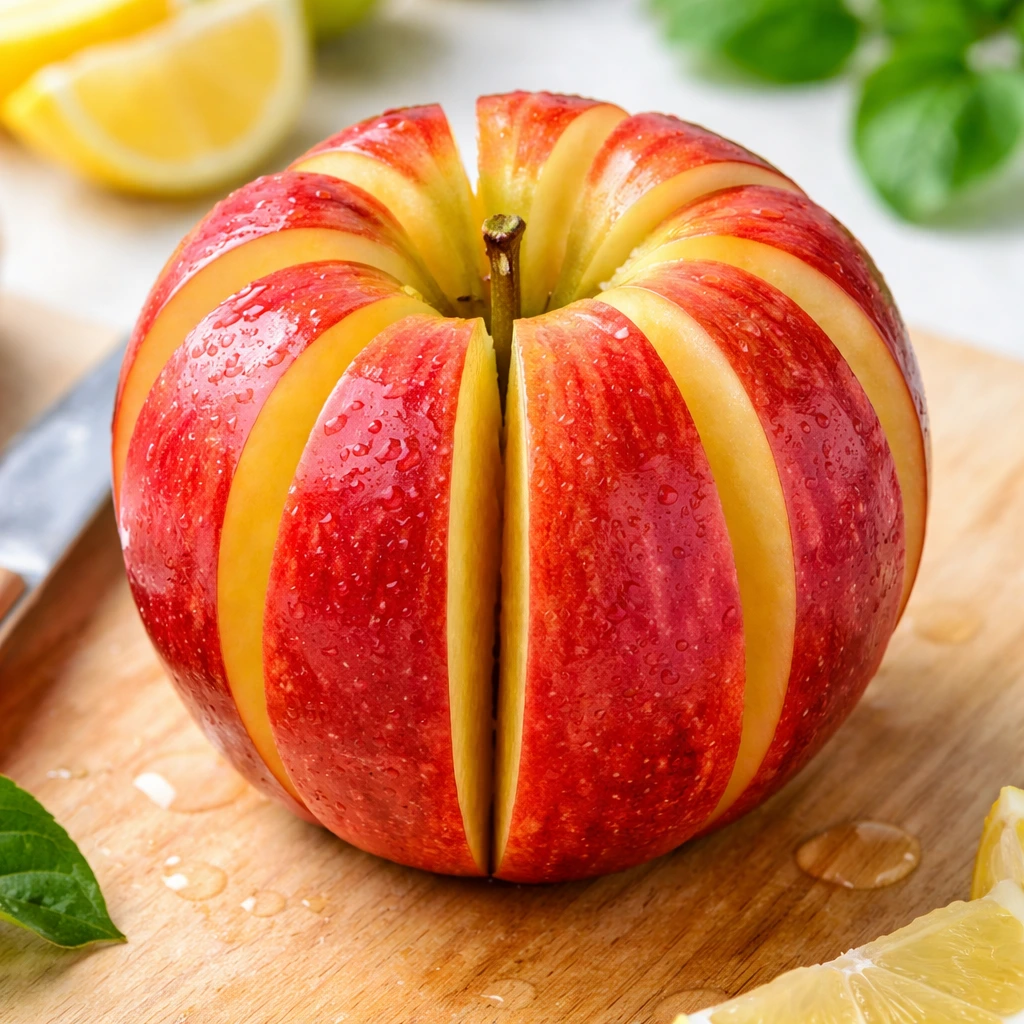
Step 4: Create the Bloomin Effect
This is where the magic happens. Using a sharp paring knife or a round cookie cutter, cut two concentric circles about a quarter-inch apart outward from the core. Cut as deep as you can without piercing the bottom. Then, working from the top, make eight equal vertical cuts down through the apple, again stopping about half an inch from the bottom. These cuts will allow the apple to fan open into beautiful petals as it bakes.
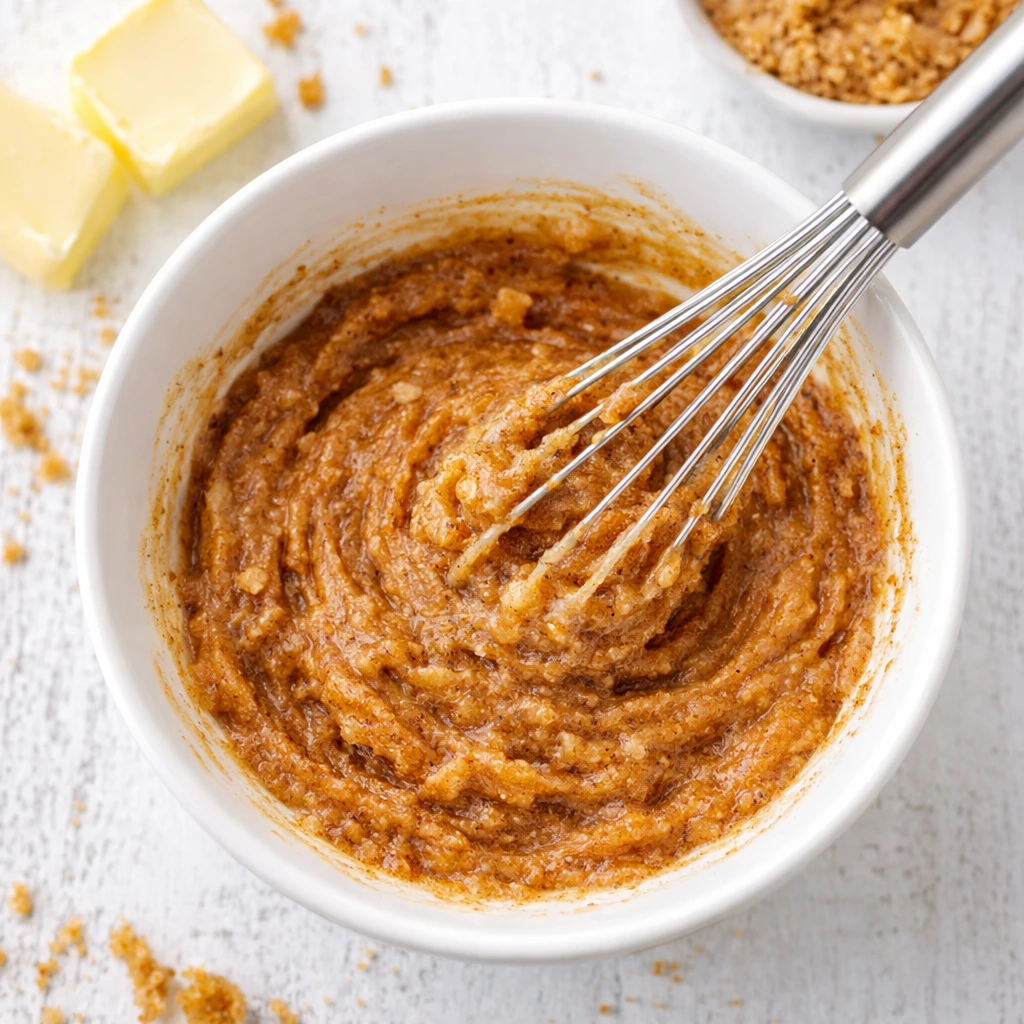
Step 5: Make the Butter Mixture
In a small bowl, whisk together the melted butter, brown sugar, and apple pie spice until everything is well combined and the sugar begins to dissolve. The aroma alone will make your mouth water.
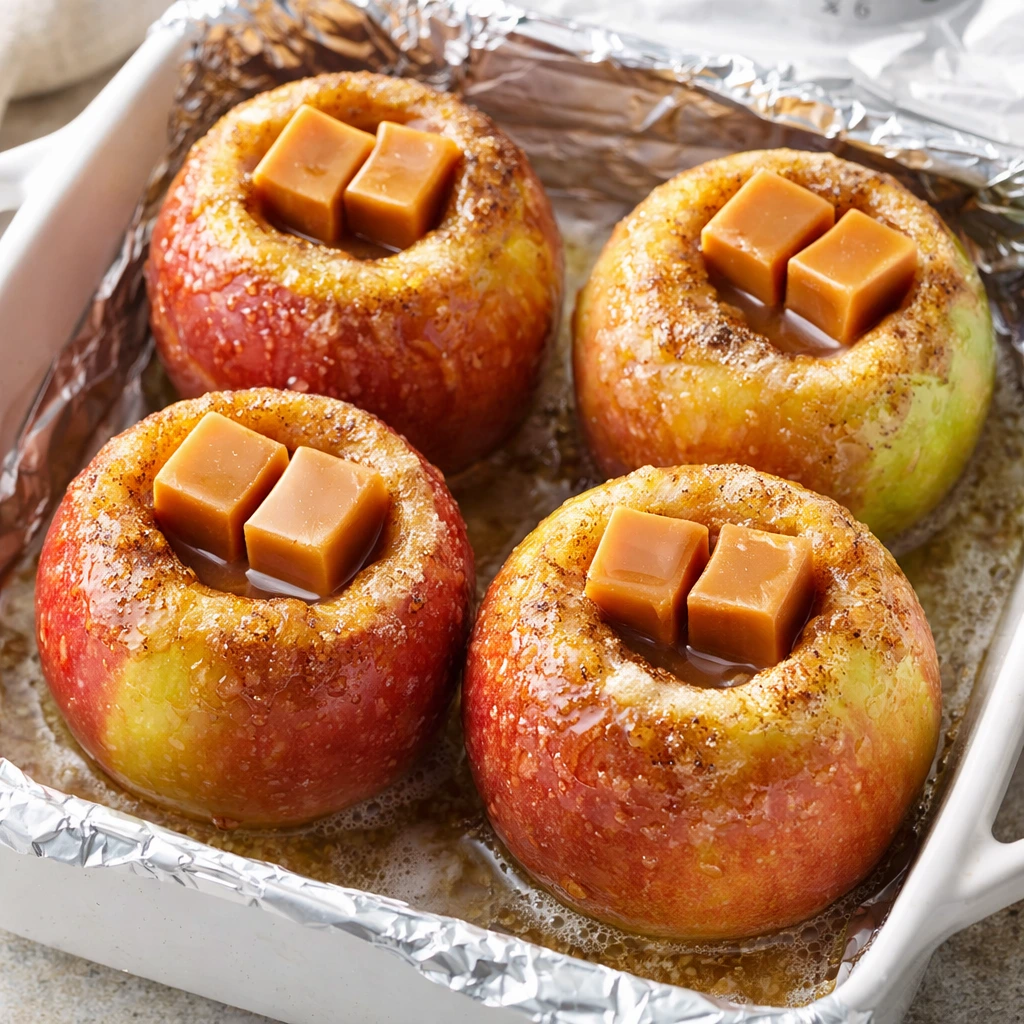
Step 6: Fill and Brush the Apples
Place your prepared apples in an 8-inch square baking dish. Tuck two caramel squares into the center of each apple. Brush the spiced butter mixture generously over the tops and into the cuts of each apple, making sure every surface gets coated. Pour boiling water around the apples until it reaches about a quarter-inch depth in the bottom of the dish. This creates steam and helps the apples cook evenly. Cover the dish tightly with foil.
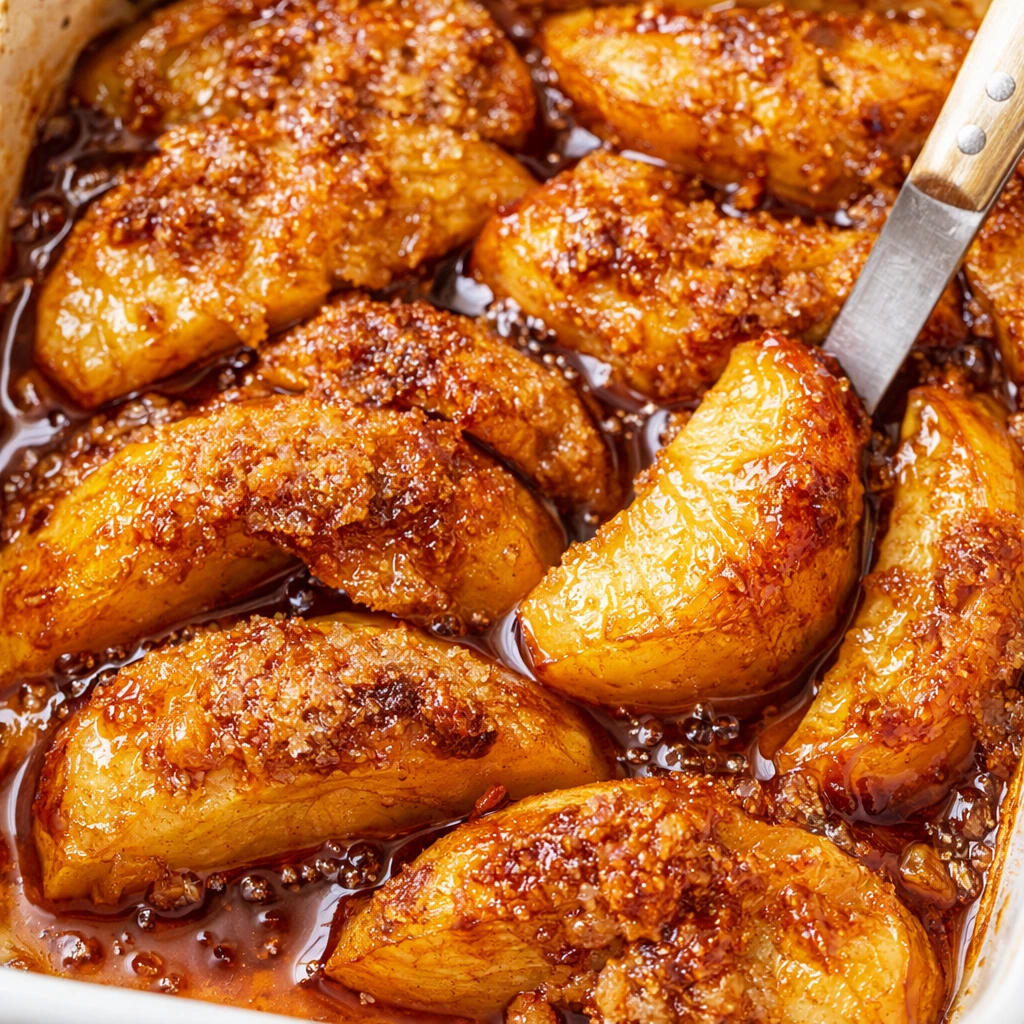
Step 7: Bake Covered, Then Uncovered
Bake the covered apples for 30 minutes. Then remove the foil and continue baking for another 25 to 30 minutes. You’ll know they’re done when the sugar starts to caramelize, turning golden and glossy, and a paring knife slides easily into the flesh of the apple.
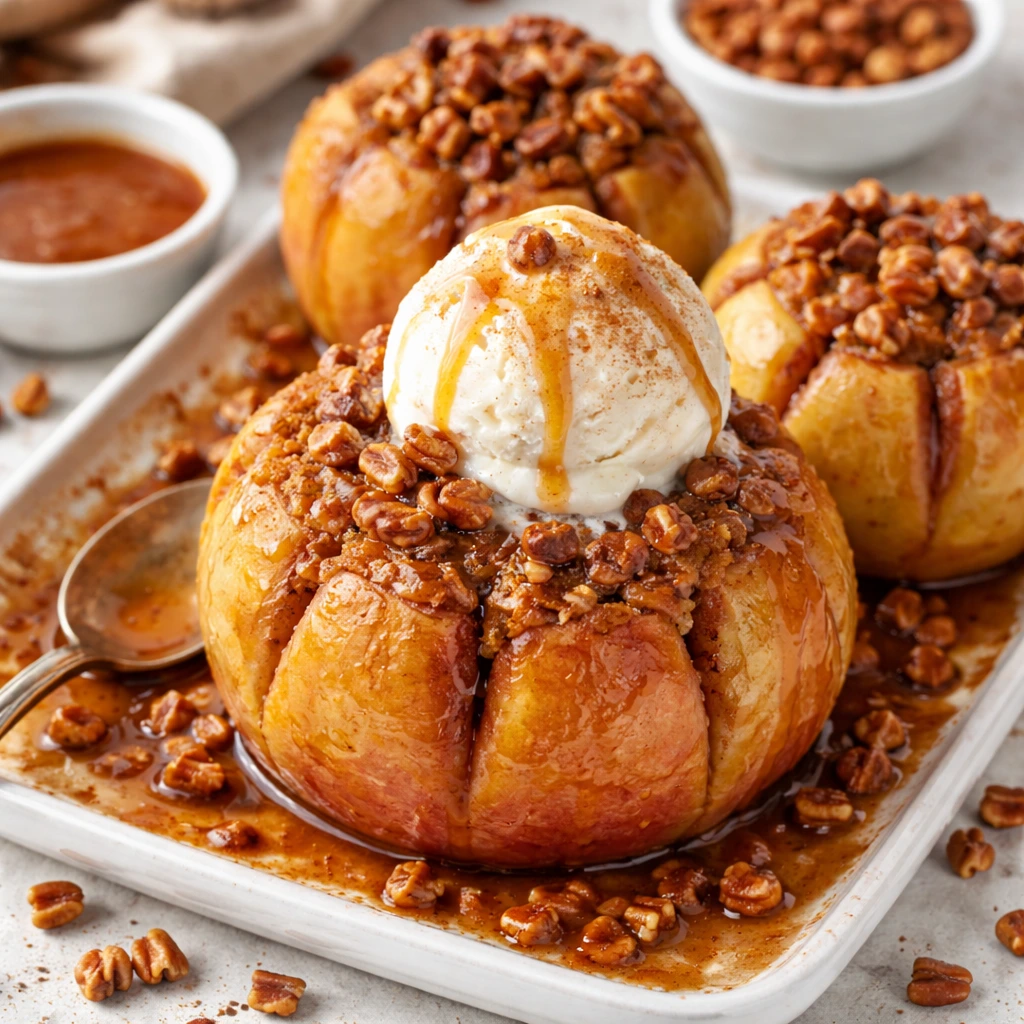
Step 8: Cool and Serve
Let the apples cool for about 10 minutes. Using clean hands, gently spread the petals apart so they fan out like a flower. Serve warm or at room temperature, topped with a generous scoop of vanilla ice cream and a drizzle of caramel sauce.
Why You Will Love This Recipe
These Baked Bloomin Apples are a showstopper that’s surprisingly easy to make. They look elegant enough for a dinner party but feel cozy enough for a weeknight treat. The combination of tender baked apple, warm spices, gooey caramel, and cold ice cream creates layers of flavor and texture that make every bite exciting. Plus, they’re naturally portion-controlled, each person gets their own beautiful apple, which makes serving a breeze.
Expert Tips For The Best Result
Choose apples that are firm and relatively uniform in size so they bake evenly. Don’t skip the step of adding boiling water to the pan, it prevents the bottoms from burning and helps the apples steam to tenderness. If your apples aren’t opening up as much as you’d like, try making your vertical cuts a bit deeper next time. And always let them cool slightly before serving, the caramel inside is molten hot right out of the oven.
Variations and Customizations
For a nutty twist, add chopped pecans or walnuts along with the caramel. If you prefer a tangier filling, swap the caramel for a spoonful of cranberry sauce or a dollop of cream cheese mixed with honey. You can also experiment with different spice blends, try pumpkin pie spice, chai spice, or even a pinch of cardamom for something unique.
Serving Suggestions
These apples are perfect for fall gatherings, Thanksgiving dessert, or a special weekend treat. Serve them in shallow bowls to catch all the caramel sauce and melted ice cream. For an extra touch, sprinkle toasted nuts or a pinch of flaky sea salt over the top. They’re also wonderful alongside a cup of hot cider or spiced tea.
Storage and Freezing Tips
Baked apples are best enjoyed fresh, but you can store leftovers in an airtight container in the refrigerator for up to two days. Reheat gently in the oven or microwave before serving. I don’t recommend freezing these, as the texture of the baked apple changes once thawed.
Recipe FAQs
Can I use a different type of apple?
Absolutely. Honeycrisp, Fuji, and Gala apples are sweet and hold their shape well. Granny Smith apples work beautifully if you prefer a tart contrast to the sweet caramel.
What if I don’t have apple pie spice?
You can make your own by combining one teaspoon of cinnamon, a quarter teaspoon of nutmeg, and a pinch each of allspice and ginger.
Can I make these ahead of time?
You can prep the apples, fill them, and brush them with the butter mixture a few hours ahead. Keep them covered in the fridge, then bake just before serving for the best texture and flavor.
Common Mistakes to Avoid
Don’t cut all the way through the bottom of the apple or the filling will leak out during baking. Avoid using apples that are too soft or overripe, they’ll turn to mush in the oven. And don’t skip the cooling time, those caramels are like lava straight out of the oven and need a few minutes to set slightly.
Conclusion
There’s something deeply satisfying about pulling these Baked Bloomin Apples out of the oven and watching them open up like flowers, golden and fragrant and impossibly inviting. They remind me that the best recipes are often the ones that make you slow down, take your time, and savor the process as much as the result. I hope this becomes one of your favorite fall traditions, something you make when the air turns cool and you want to fill your home with warmth.
Timing
Prep Time: 15 minutes
Cook Time: 55 minutes
Cool Time: 10 minutes
Total Time: 1 hour 20 minutes
Servings: 4 (serving size: 1 apple)
Nutritional Information (per serving)
Each serving contains approximately 745 calories, 41 grams of fat, 97 grams of carbohydrates, 7 grams of fiber, and 5 grams of protein. These apples are rich in vitamin C, calcium, iron, and potassium, making them a sweet treat with some nutritional benefits.
Your New Go-To Comfort Food Awaits:
Go ahead and give your family a dessert they’ll remember long after the last leaf has fallen.
Baked Bloomin Apples
Ingredients
Method
- Preheat your oven to 375 degrees Fahrenheit. Gather all your ingredients and tools so everything flows smoothly. This is a recipe that requires a little patience, but the result is absolutely worth it.
- Slice off the top half-inch of each apple. This creates a flat surface and removes the stem, giving you a clean starting point for coring.
- Using an apple corer, melon baller, or even a sturdy teaspoon, carefully remove the core from each apple. Start at the top and work your way down, but stop about an inch from the bottom. You want to create a well for the caramel, but you don’t want to cut all the way through or the filling will leak out.
- This is where the magic happens. Using a sharp paring knife or a round cookie cutter, cut two concentric circles about a quarter-inch apart outward from the core. Cut as deep as you can without piercing the bottom. Then, working from the top, make eight equal vertical cuts down through the apple, again stopping about half an inch from the bottom. These cuts will allow the apple to fan open into beautiful petals as it bakes.
- In a small bowl, whisk together the melted butter, brown sugar, and apple pie spice until everything is well combined and the sugar begins to dissolve. The aroma alone will make your mouth water.
- Place your prepared apples in an 8-inch square baking dish. Tuck two caramel squares into the center of each apple. Brush the spiced butter mixture generously over the tops and into the cuts of each apple, making sure every surface gets coated. Pour boiling water around the apples until it reaches about a quarter-inch depth in the bottom of the dish. This creates steam and helps the apples cook evenly. Cover the dish tightly with foil.
- Bake the covered apples for 30 minutes. Then remove the foil and continue baking for another 25 to 30 minutes. You’ll know they’re done when the sugar starts to caramelize, turning golden and glossy, and a paring knife slides easily into the flesh of the apple.
- Let the apples cool for about 10 minutes. Using clean hands, gently spread the petals apart so they fan out like a flower. Serve warm or at room temperature, topped with a generous scoop of vanilla ice cream and a drizzle of caramel sauce.